
Thank you for buying your 'Powersheds' Shed from us, at My Garden Buildings. All Power products come with instructions and videos, to make self assembly that little bit easier.
However, we know that some prefer having a professional carry out the installation. That is why we have partnered with MyJobQuote (affiliate link*), where you can post your job and receive free quotes from local installers. You can view more information about this by clicking here.
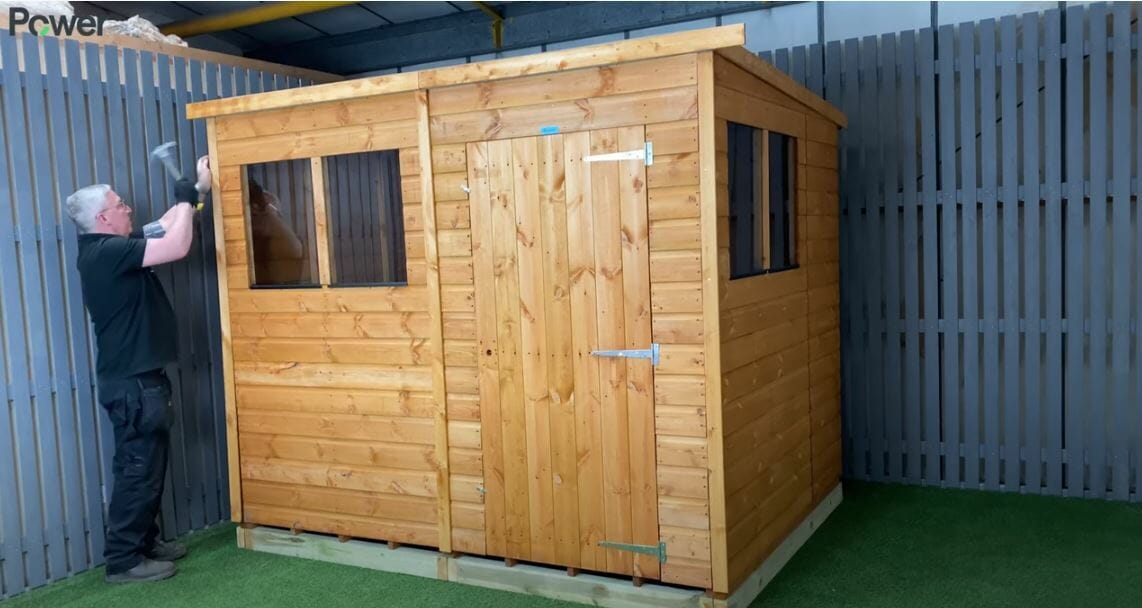
If you are installing the shed yourself, here is a helpful guide. The following installation steps apply to all Powersheds Pent models:
If you have bought a 'Powersheds' shed with an apex roof, we have an installation guide just for you. Please click here to view it.
Powersheds Pent Garden Shed Assembly Video
Powersheds Pent Bike Shed Assembly Video
Before installing:
1. Unpacking your pent garden shed safely:
- Two people minimum to unpack
- Place the pallet on firm level ground
- Cut the plastic banding
- Remove each panel by removing screws one column at a time as indicated below
- Check all the components against the instructions / check list

2. Shed base information: All of our garden sheds require a firm and level base. When thinking about where the garden building and base is going to be constructed:
-
Ensure that there will be access to all sides for maintenance work and annual treatment:
-
Remember not to place the base too close to any walls or fences, as there may be a slight overhang on the roof of the garden building which may come into contact with the wall or fence.
-
Ensure the base is level and is built on firm ground, to prevent distortion. Refer to PowerSheds.com for base dimensions.
-
Consider when placing the base next to trees or large bushes as this could cause problems from overhanging branches, especially if these are likely to grow and come into contact with the building in the future and could cause the felt to rip
We do offer a Powersheds Base Kit as an optional extra when buying your shed.
The base is slightly smaller than the external measurement of the building, i.e. the cladding should overhang the base, creating a run¬ for water. It is recommended that the floor is at least 25mm above the surrounding ground level to avoid flooding.
If you have not chosen to purchase our Powersheds Base, then other suitable bases would include a concrete base (75mm of concrete on top of 75mm of hardcore) or a paving slab base (slabs laid on top of 50mm of sharp sand).
3. Fixing pack: Your fixing pack will include:
- 25mm screws (silver)
- 35mm screws
- 50mm screws
- 70mm screws
- Clout nails (for the felt)
- 40mm galvanised nails
4. Remove any transport blocks from the bottom of the blank and window panels. These are there to offer further protection to the bottom board of the panel.
![]()
5. Pre-drilling – In the instructions we will talk about screwing panels together. We recommend this is done with a drill. Here, we suggest that you pre-drill the timber with a 3mm drill bit before inserting the screws. This will minimise the chance the timber will split.
Shed floor assembly
6. Lay down your floor panel(s) onto your firm and level base into the desired position of your shed. Be sure to consider any overhangs on the shed when deciding the correct position.
7. Join the floor panels together using the 50mm screws provided, using around three screws per join. At this stage you can also screw the two ‘heavy duty bearers’ which are two pieces of framing joined together, to each gable end (the end where the triangular ‘gable tops’ will go later’). Join the bearers by screwing through the floor joists first so the screw goes as far into the bearer as possible.

Shed door assembly
8. Your shed will either come with a single door or a double door depending on what you selected when ordering. Double doors are already hung on the door panel. However, for a single door you will need to hang the door.
For a single door you can choose which way round to hang it – left hand or right hand. (note – if you choose a left hand hinged door then the lock has to be unscrewed and positioned the correct way round as it will be upside down)
9. For a single door, lay the door panel on the floor (you can lie it on the shed floor if you wish). Line up the door onto the framing so that it is square. The door should be positioned closer to the side where the hinges go. Make sure the lock is on the inside of the shed when the door is closed. Secure the hinges in place using the 25mm screws provided.
10. Choose two places on the door to secure your two turn buttons – one towards the top, one towards the bottom. For double doors a turn button will already be secured. Be careful not to screw this too tightly or it will not turn.
Shed wall panel assembly
11. Please ensure you have removed the transport blocks.
12. Your shed will come with a number of wall sections. The quantity of these will depend which type and size you ordered – there could be 4ft Blank Panels, 2ft Blank Panels, 4ft Window Panels (unless you have selected the windowless version), and a door panel (which could be a single door or double door). Please see the components table in your instructions to confirm which panels you should have for your Power shed.
13. Lay out the wall panels in the configuration you want for your garden building. The blank panels, door panel and window panels can go in any position.
14. Start with the 4ft panel that will be part of your gable end – position this on top of one of the heavy duty bearers which you attached in the previous section. Ensure the side of the panel is flush with the side of the floor.

15. Place another wall panel again secure using the 50mm screws provided. Important! – When securing panels together ensure they line up at the top (so the building is square) and that only the ends of the cladding are shown, which will later be covered with corner strips). This is only in the corner when the side meets the gable. You can choose the position of the doors and windows as you build the shed.

16. Continue doing this to place all remaining wall panels in position.
17. When you have secured all the wall panels you then need to secure these to the floor using 70mm screws provided. Screw into the floor with 2x screws for every wall panel (internally) ensuring the screws are driven through the framing at the bottom of the side/gable walls, through the floor boards and into the floor joists. Ensure all panels line up at the top.

Pent roof shed
If you have ordered a pent shed, follow these steps: If you have ordered a pent shed, follow these steps. If you have ordered an apex shed, please click here.
Front pent top and gables
18. Add the pent front top to the side you want to be higher and screw to the panels below with 50mm screws.

19. Line up the gable tops with the panels at the gable ends (the ends where you attached the ‘heavy duty bearers’) and secure them to the wall panels with 50mm screws from the inside, screwing upwards through the framing.

Pent roof panels
20. Depending on the size building you have ordered, your roof panels will be 2ft, 3ft, or 4ft wide. Place the roof panels in place so that the framing on the roof panel runs parallel with the gables i.e. from the front high side to the back low side.
21. Make sure the framing on the roof is in line with the framing on the gable top so that the overhang on the front and back is correct.
22. Join the roof panels to each other and to the gables using 50mm screws, going through the framing from the inside of the building.
23. Then, screw the roof panels to the side wall panels with 50mm screws (ensuring you screw up through the framing from the inside of the building into the framing on the roof panels).
Finishing touches
24. Using the 40mm galvanised nails, fit the bargeboards to the foot and sides of the roof. Again, these may need cutting down with a saw depending on what size building you have.
25. Secure corner strips at each corner of your Power shed with 40mm nails (at least four per strip). Extra strips are provided to cover any joins between side wall panels.
26. Secure the door pull to the door with 25mm screws.
27. Peel the protective blue sticker off the Power branding plate above the door.
* Please note, at not extra cost to you, if you hire someone from My Job Quote we may get a small referral commission.